AutoScript Web Release Notes - February 22, 2023


A VoiceScript.ai Product
for the Legal Market
AutoScript Web - Release Notes
Summary
Over the next few weeks, VoiceScript will be releasing significant updates / upgrades to our AutoScript Web platforms. The next major releases are currently scheduled for:
Wednesday 22 February (Desktop Version 12.82.1)
Tuesday 7 March (UI will be redesigned, so the web version will LOOK different!)
Actual release date might change
The goal of AutoScript Web is to work in tandem with AutoScript Desktop to allow agencies to better automate a significant portion of their workflow management and reduce the need for manual production team time. The goal of this document is to provide you with an overview of the functionality contained in the Wednesday 22 February release:
Create your own WorkSpaces logic
Choose to have just the ONE workspace for yourself or for everyone, OR
Create many different WorkSpaces
General WorkSpace
Rush File Workspaces, etc
Create your own roles (Transcriber, Proofer, Production Admin etc)
Limit permissions to see only Transcription Jobs, Proofing jobs etc.
Invite users to WorkSpace(s)
Choose to limit a user to just 1 WorkSpace OR add them to multiple WorkSpaces.
Create a new job in ONE WorkSpace and move it to another WorkSpace if needed
Eg, Start a job in “General” WorkSpace then a client calls to request it Expedited, move the job to “Rush” WorkSpace where it can continue the rest of the process.
Allow users to Claim jobs (ie, pick up from a list of available jobs) OR Assign jobs to specific users
Each file has a hardcoded 4 step flow
Speech to Text processing (Admin Only)
Transcription
Proofing
Production (Admin Only)
SAVE Jobs from AutoScript Desktop; pushing jobs to next step in AutoScript Web
One of the most important features for workflow automation in this release
Note that it will ONLY work when we have pushed out the next AutoScript Desktop release currently scheduled for Thursday 2nd March 2023 (new buttons which relate to this functionality will be included / deployed).
Transcriber can “claim” a job in a WorkSpace, open it on AutoScript Desktop, complete their edits, then hit the “UPLOAD” button and their work is saved to AutoSCript Web, AND the job status on the Web changes from “Editing” to “Waiting for Proofer”.
Proofer can then claim the same job from the Web, import the latest version into AutoScript Desktop, make their edits, hit “UPLOAD” and this job will appear back on the web ready for Final Production.
Critical automation of the transcript process to reduce manual file management.
Assign different payment methods to different WorkSpaces.
Either add a different credit card to a different WorkSpaces, OR
Share the minutes of a Prepaid Package you have purchased across different WorkSpaces.
Add a “Due Date” for file
For now, information only. In future releases there will be notifications and other functionality tied to this “hook”
Add notes for Transcribers / Proofers (they can view this note in Web)
WorkSpaces
We have added new, important functionality called “My Account” where you can see a snapshot of your account and your WorkSpaces. From here you can view and update your account details and password, add additional WorkSpaces and manage your billing accounts.
Account information
To access your account information you will click on the user button [1] in the top right corner with your initials in it and select [2] My Account:

From this new window, you can do the following:

[1] View / Edit your details, including changing your password.
[2] A list of ALL the WorkSpaces you have created
This is a list of all of the WorkSpaces you own as an admin
Click [3] on the “PLUS” Icon from this view to create a new WorkSpace
[4] You can now add a credit card to each WorkSpace or share one Plan (Package) across multiple WorkSpace. Keep in mind:
The first time you see this update, there will be a “billing account” for EACH WorkSpace you have. This was automatically created by the system when this update was pushed.
Simply delete the “extra” billing account added by the system to just your one credit card
The Sidebar.
On the vertical left-hand side menu panel, you will see all the WorkSpaces available to a user.

The very top WorkSpaces [1] is always the “personal workspace” of each individual's user account regardless of how many WorkSpaces they have been invited to. Hovering your mouse over each WorkSpaces will open an information bubble with the full name of the workspace.
All the other WorkSpaces [2] below the personal workspace will be split between [a] WorkSpaces that others have invited you to, or [b] WorkSpaces that you have created for yourself. If you create multiple WorkSpaces and invite other users into them, then your workspace will be displayed in that user’s sidebar in their AutoScript account.
Every person will have a “+” icon available to them from their sidebar [3] which allows them to add additional WorkSpaces to their account. A job run from your account or WorkSpace is owned by your account. This job can be shared with other users that you have invited into your WorkSpace, but any jobs run by your team in one of your workspaces CANNOT be transferred by a Transcriber / Proofer to another workspace which THEY created AND they cannot create new workspaces in your company environment, nor run jobs in a new workspace they created which would be charged against your billing account.
Creating a New WorkSpace
Click on the + icon on from the sidebar, OR
Select Name [1]: this is the name of the WorkSpace that all users will see when they “Hover” their mouse over the WorkSpaces icon on the sidebar menu
WorkSpace ID [2]: you need to come up with a unique “tag” which will be visible in the URL when you are in that WorkSpace (must be lower case, no special characters)

Add Card / Billing [3] - here you can choose which Credit Card or Package / Plan you want to “power” this WorkSpace.


Click into the WorkSpace you want to edit, then go down to the bottom of the sidebar menu towards the “gear” icon:
[1] You can edit the name and ID of the WorkSpace
[2] Delete the WorkSpace
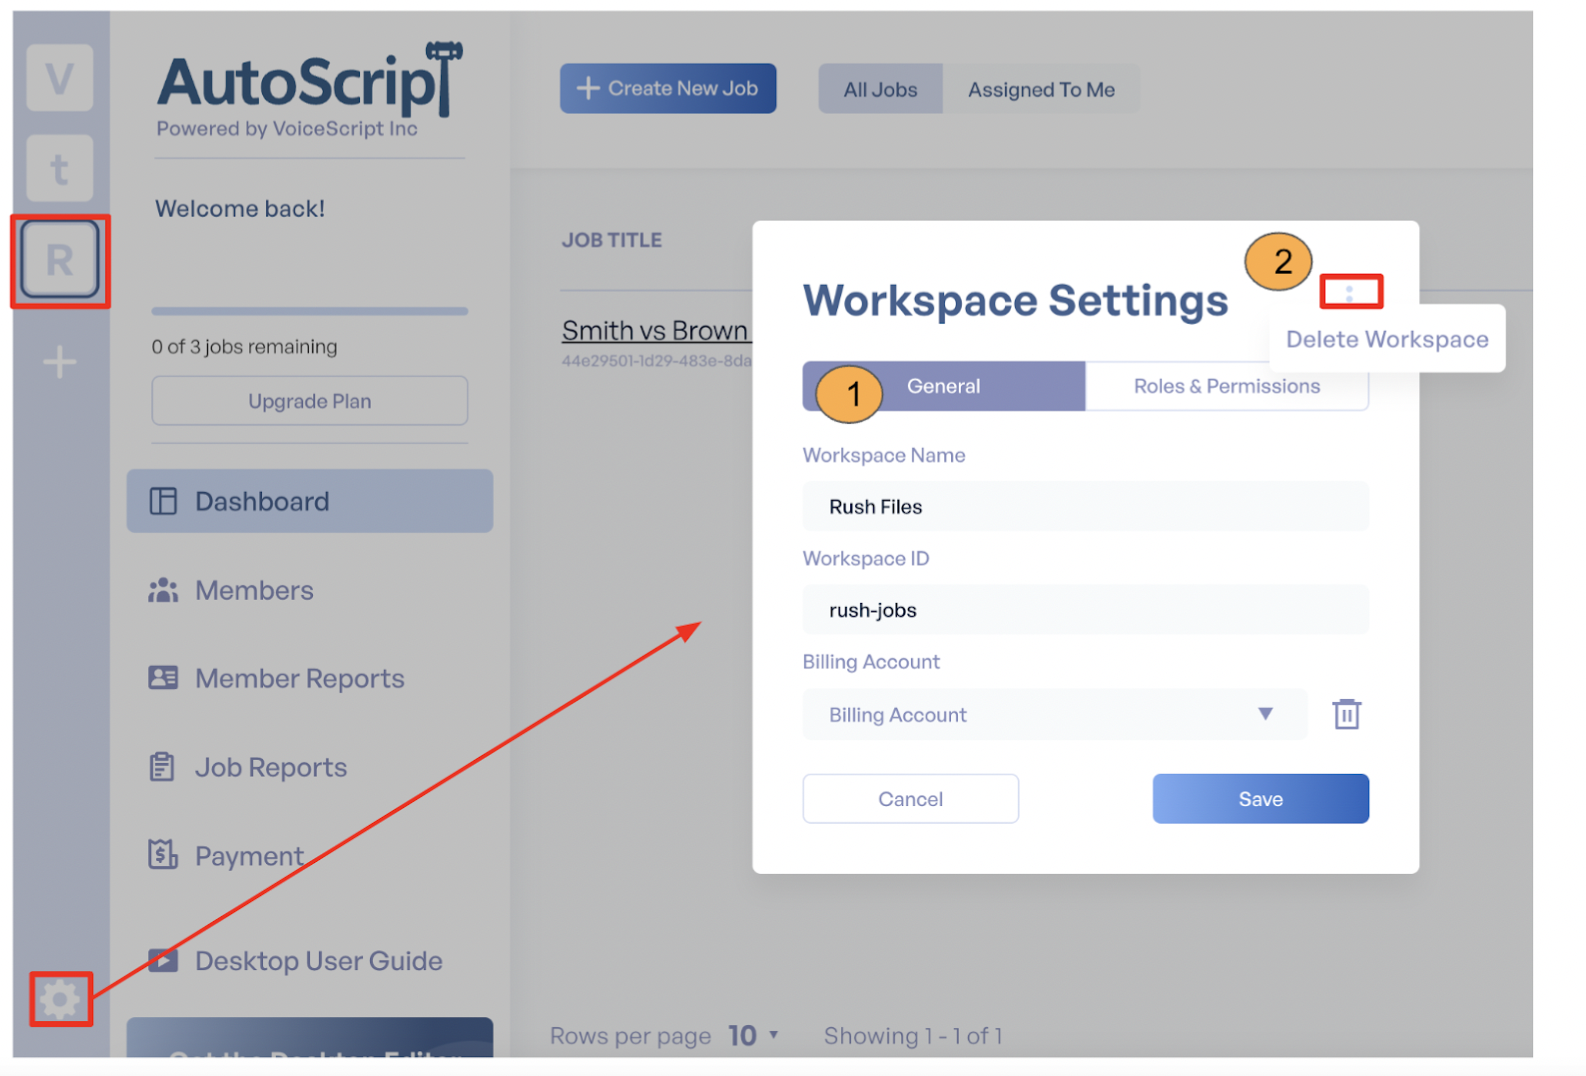
You can also Delete a WorkSpace by going to:
My Account - click on the “3 dots” next to a specific WorkSpace and then hit “delete”

User Management
To add new users to your Organization, you will need to ENTER ONE of your WorkSpaces and add that user to that ONE WorkSpace. Once added, you can then also add that same user to another WorkSpace if desired. At the moment there is no “Bulk Invite” option available, and you are limited to inviting just one user at a time.
To add a new User:
Select WorkSpace
Go to “Members”
Select “Invitations”
Click “Invite Member”
Add email address & select Role (see more details below)

Default Roles:
Admin: Super admin, including Billing
Operator: OPS team
Guest: (can only view files assigned to them)
Transcriber
Proofer
Once you invite a user, you will see their details in the “Invitations” tab of Members section:

The user who was invited will receive an email:


Passwords must contain at least one number AND must contain at least one symbol (@!#$%^&*()_)

Click “Accept” to finish

Every new user will be given the option to “Take A Tour”

From your account you will now see that the Status of the invited changed to “Accepted” [1]
You can also remove a user from the WorkSpace by clicking on the “Trash” icon to the right of the user [4]. NOTE: deleting a user will remove them ONLY from this WorkSpace. They will still have access to any other WorkSpaces you have invited them too.
You can also see all the members in a WorkSpace by clicking the “Members” tab at the top and all the roles associated with each user in this WorkSpace [2].
Under members, you may see the [3] Enable / Disable toggle. When the user is “Enabled” then they will see the WorkSpace you have invited them too when they log in.

However, if you move the toggle towards “Disable” then the user will have the whole WorkSpace disappear for them from their AutoScript account. If you “Re-Enable” a user then the WorkSpace will reappear in the sidebar menu again.

Roles & Permissions
Click into the WorkSpace you want to edit, then go down to the bottom of the sidebar menu and click on the “gear” icon. Click on the “Roles & Permissions” Tab:


[1] Each WorkSpace comes preloaded with 3 default roles, which cannot be changed:
Admin
Operator (ie, OPS team)
Guest - (just those people who can come in and see jobs assigned to them)
[2] This icon will show you all the users in this WorkSpace with this role, allowing you to add / remove users with the role
[3] Here you can see the permissions switched on for each role. You can change any permissions with the right permissions (pun intended!) but you can’t change the 3 default roles.
Please scroll to the next page to see a detailed description of all the permissions, and see which permissions are pre-set to the 5 default roles in every workspace.
Creating a New Job
We have made some changes to the fields in the “Create New Job” window. Remember, you need to first select which WorkSpace you want the job to be in and THEN run the job.
It’s super easy to change a file from one WorkSpace to another once it’s in progress, see the “Workflow Management” process below.

As you can see, we have significantly simplified the form as well as added two more fields:
Simplifications (removed fields):
Job Type
Recording type
City
State
Additions (new fields):

[1] Notes: you can now write notes to the Transcribers / Proofers to see
All notes will be visible on the WEB only (not yet on Desktop App) when a user clicks on the job name

[2] Due Date: select a date from a calendar (2 below)
Today no new functionality is tied to this due date, but it’s a hook for future features.
Workflow Management
Once a file has successfully gone to Automatic Speech Recognition (ASR) Processing, you can track the progress of each file in the “Dashboard” tab of the WorkSpace you have chosen to run the file in. As you can see, we have revamped and improved the UI, making it more user friendly.

A closer inspection of the new UI (part 1)

[1] File name is now in big, clear font
File ID is under the filename in small font, only to be used if contacting support
Click on the JOB NAME to see details, including NOTES field
[2] Due Date, whatever you set it to when creating the job.
Note you can edit the due date as an admin
[3] Assignee, with name and email
Either if the user “Claimed” the file
Or was assigned the file via admin
If assigned, user assigned received an email notification that this file was assigned to them
[4] Status:
Processing
Ready for Editing
Editing
Ready for Proofing
Proofing
Ready for Production
Complete
The next “click” Icon is a File History Tab, showing:
Status change of the file
Assigning changes of the file

The “% Edits'' icon is a BETA / Experimental feature we are testing out. It provides an estimate on how far a Transcriber / Proofer is through their file based on how far along their cursor is in AutoScript desktop relative to the audio duration

For example, if the transcriber is on minute 40 out of a 60 minute file, then it would show 67% completed. Of course the reliability of such a feature needs to be taken into consideration, as it's a common practice for transcriber to go through a first pass and then do a second pass on the document to find the inaudibles / tricky parts.
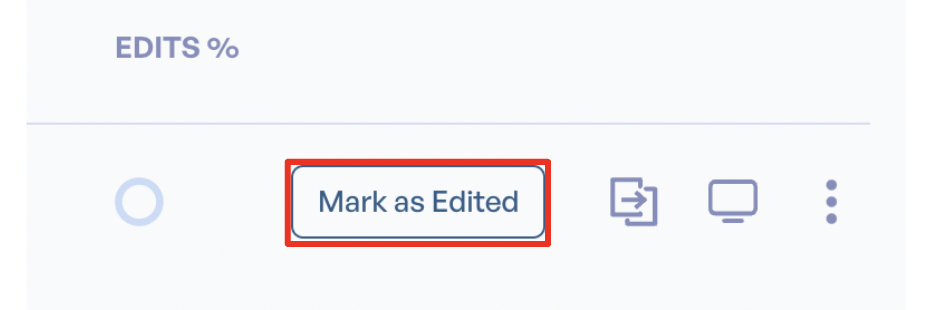
The icon above is very important - this is where the Transcriber / Proofer / Production Person needs to click to indicate that they have completed their part of the process and the file can move on to the next stage.

The next icon is how you move a file from one WorkSpace to another!

This icon is how a Transcriber / Proofer can easily open the job in Desktop when they claim a job.
The “three dots” Icon has been used to “compress” a few more very important pieces of functionality, to make space for the new UI and new buttons:
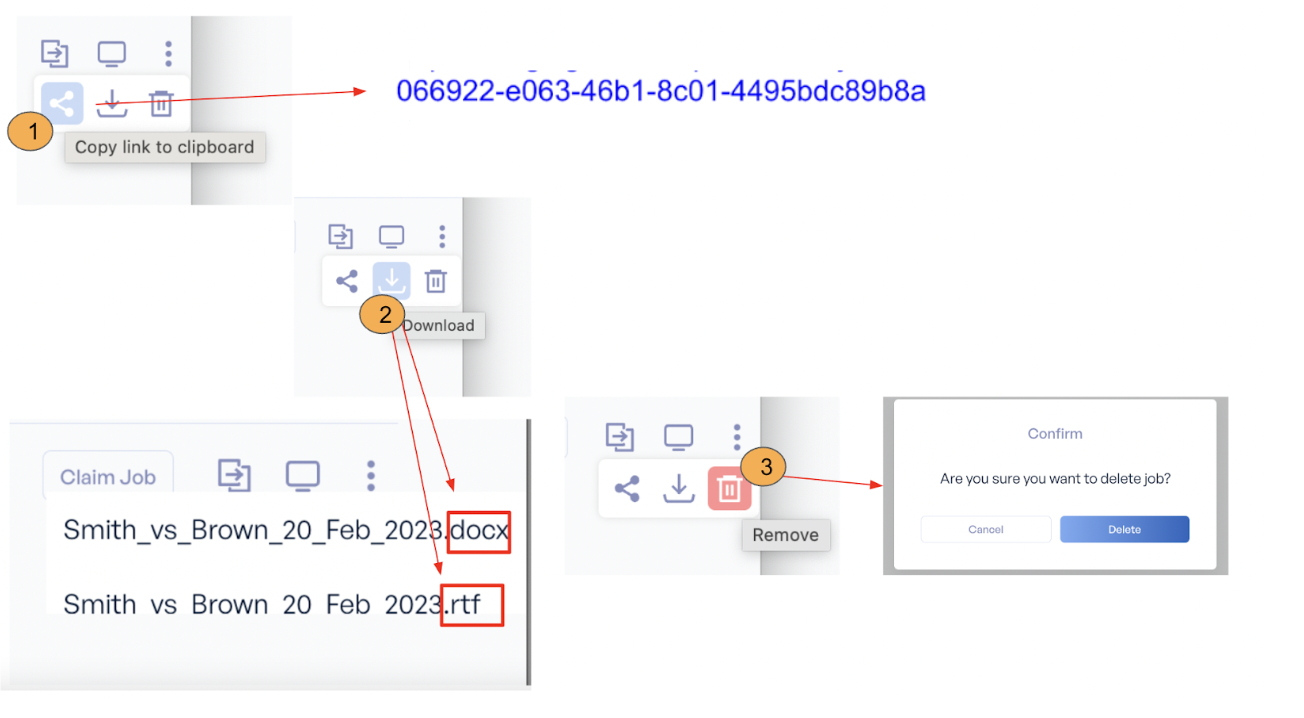
[1] Copy Link - if you want to send this job to someone else, they can click on the link and it will open up the job in AutoScript Desktop
[2] Download ASR only in .docx and .rtf file formars
[3] Permanently delete this file (Admin Only I hope?!)
Saving Jobs (Coming Soon)
The below functionality will be part of the AutoScript Desktop release scheduled for Thursday 2nd March.
Once a Transcriber has completed their edits in AutoScript Desktop, they can SAVE their work via the “Upload” button. It says “Upload” because the text is being uploaded to the originating WorkSpace on our servers.

Once the upload is completed, that’s it! They DO NOT need to export the job into a Zip folder and upload it anywhere, it’s all saved. Most important is that the status button on the dashboard is changed for the next phase in the process.
Edited text will be saved to the originating WorkSpace on our servers
Job status will automatically be pushed to the next phase
Ready for Proofing if submitted by Transcriber
Proofer will be able to claim this job, import into AutoScript Desktop the last saved version of the document.
Ready for Final if submitted by Proofer
The Production Team will be able to claim this job, importing into AutoScript Desktop the last saved version of the document.
When a job is claimed, the user will click on the “desktop” icon to open up the Job in AutoScript Desktop. It will ask you to select a version of the job you want to import from a list which is sorted by “LAST SAVED” job at the top which is the version each person on the process should be using.

Related Articles
AutoScript Desktop - Release Notes - 1.1.329
Today's release of version 1.1.329 of AutoScript Desktop included the following: Bug Fix: Corrected a problem with the ASCII Export feature that was causing some words to be concatenated. As always, if you experience any trouble or just need a little ...AutoScript Desktop - Release Notes - 1.1.349
The release of version 1.1.349 of AutoScript Desktop included the following: Bug Fix: Closing the "Downloading Audio File" dialog doesn't cancel job loading Bug Fix: Paste in the Find & Replace boxes also pastes in the document Bug Fix: Words ...AutoScript Desktop - Release Notes - 1.1.406
The release of version 1.1.406 of AutoScript Desktop included the following: Core Change: We finally have our Microsoft certification. This means no more warnings upon installation, and less issues related to anti-virus software. Bug Fix: Spell check ...AutoScript Desktop - Release Notes - 1.1.459
The release of version 1.1.459 of AutoScript Desktop included the following: MAJOR BUG FIX: User Experiencing Crashes When Adding Comments BUG FIX: Triple-Clicking to Select ASR Placeholder Creates Highlight Desynchronization BUG FIX: Spellcheck ...AutoScript Desktop - Release Notes - 1.1.433
The release of version 1.1.433 of AutoScript Desktop included the following: Bug Fix: a rare bug that occurred when updating the speaker list. Bug Fix: a rare bug that occurred during CAT Export. Bug Fix: a very rare startup bug that was only noticed ...