AutoScript Desktop Release Notes - March 2, 2023


for the Legal Market
Introduction
AutoScript is the industry’s premier Automatic Speech Recognition (ASR) solution designed exclusively for the legal industry. Developed by VoiceScript, a legal technology company, AutoScript delivers unsurpassed text output from audio recordings of legal proceedings. AutoScript Desktop is a transcript production/ASR editing tool that is also purpose-built for the legal transcription industry to streamline the process of turning ASR output into a delivery-ready transcript reducing transcription time by up to 75% in some cases.
AutoScript Desktop continues to enhance and add features to improve on the user experience.
This update scheduled for March 2, 2023, includes various bug fixes and the following new and enhanced features:
· Job versioning
· Association of a layout to a template
· New “Layout” structure
· Added and restructured tabs and icons on the ribbon
Getting the Update
AutoScript Desktop uses a feature for automatic updates. The program will check if there are updates available for you. When you open your AutoScript Desktop it automatically checks to see if there is an update available. If one is available, it will just download and install it before finishing opening the application.
Versioning
AutoScript Desktop in connection with the Jobs Dashboard on AutoScript Web now tracks versions of your transcript.
The initial version is the raw, unedited text output from the ASR. Once a user downloads that version and makes edits a second version can be uploaded back to that job in AutoScript Web. When a proofreader is ready to proofread the edited version, they can simply download the edited version from AutoScript Web.
No more exporting a version of the job and having to upload it to a share drive to pass it on to the next person.
Uploading your Edited Version to AutoScript Web
After completing your edits in a transcript, simply click on the Upload to AutoScript Web button from the Home tab.
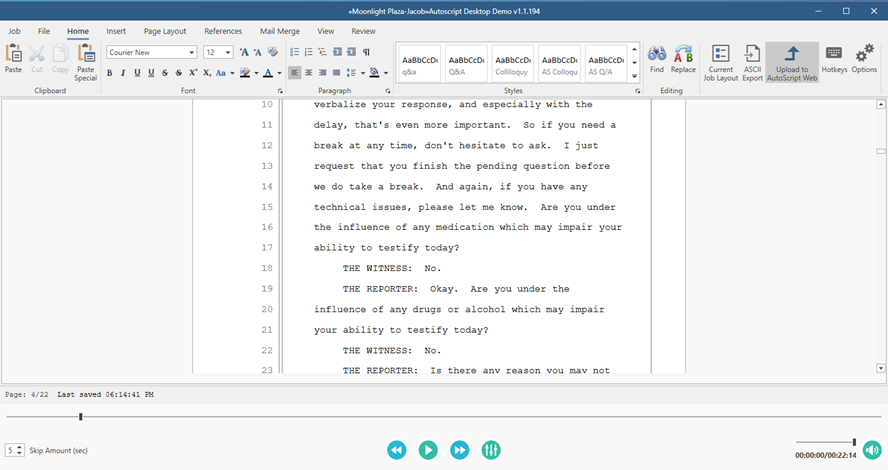
This will upload your completed version of the transcript back to the originating job.
Once the job has completed uploading you will receive a job uploaded confirmation window.

Downloading a Version from AutoScript Web
To download an edited version of a transcript from AutoScript Web you will need to go to the job in the Jobs Dashboard and select to open the job from the download job icon.

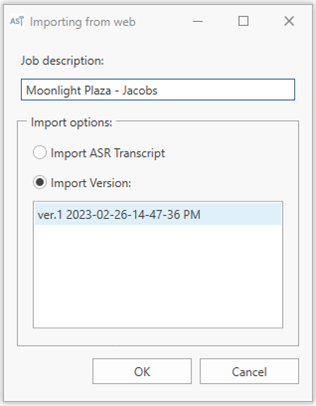
There may be only one edited version or there could be several versions. Versions are numbered numerically in the order they were produced and will also contain the date and time they were uploaded.
You will select the version you want to open and click on the OK button.
You will select the version you want to open and click on the OK button.
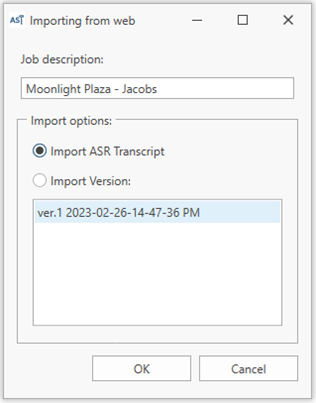
If you want to open the original unedited version produced from the ASR, then you will click on the Import ASR Transcript option and click on the OK button.
Navigating the New Menu Ribbon
The Menu ribbon has taken on a new look to improve on the workflow process. We have added a new tab called Job and have moved the items that a user typically uses while working on a transcript to the Home tab for convenience.
Job Tab
The job tab contains those tools relative to
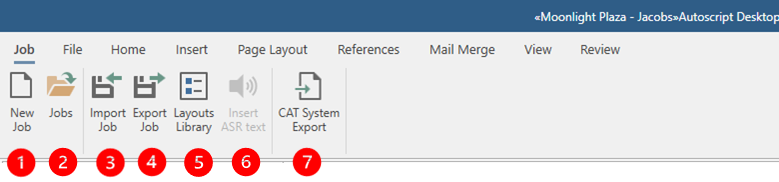
1. New Job directs you to AutoScript Web to create your new job.
2. Jobs is where you go to open and manage existing jobs
3. Import Job is for importing jobs that another user had exported into a zip folder and sent to you.
4. Export job is for creating a zip folder of your audio, layout, and transcript file that you can send to another user to import into their version of AutoScript Desktop.
5. Layouts library is where you can view and manage your layouts. From here you can create new layouts, associate templates with layouts, edit layouts and remove layouts.
6. Insert ASR text is used for inserting the text produced from your audio file into either your layout/template for editing or the default layout and blank template for exporting to CAT.
7. CAT System Export is used for creating a zip file output containing the text, reverse steno, and synced audio for import into your preferred CAT program for editing.
File Tab

1. Undo allows you to undo previous actions (Ctrl+Z).
2. Redo allows you to redo an action (Ctrl+Y).
3. Open allows you to open previous jobs.
4. Save allows you to save your document (Ctrl+S).
5. Save As allows you to save your document out into a different format (F12).
6. Quick Print sends your document to a printer without opening the print dialog window.
7. Print opens the print dialog window (Ctrl+P).
8. Print Preview will give you a preview window of what your printed document would look like.
9. Document Properties opens the properties window.
10. Open Logs opens the location of the log files.
11. Sign out is where you would log out of AutoScript Desktop.
Home Tab
The Home Tab contains the tools you would most likely use while editing a transcript.

1. Clipboard is where you can access the cut, copy, paste and paste special tools.
2. Font is where you access the tools for making changes to your font attributes.
3. Paragraph is where you can make changes to your paragraph settings.
4. Styles is where you can view and edit the paragraph styles in your transcript.
5. Editing is where you find the tools for find and replace.
6. Current Job Layout is where you can view and edit the current format settings for your transcript.
7. ASCII Export is the tool to create an ASCII document for use in a transcript production tool.
8. Upload to AutoScript Web is a tool for uploading your completed version of your transcript back to the originating job in AutoScript Web.
9. Hotkeys is where you can view, edit, and print your hotkeys.
10. Options is the tool where you can configure the follow play features and custom configure your foot pedal.
Layouts
Layouts has undergone a complete overhaul with the intention of improving the workflow and time needed when configuring new format requirements for a layout. All format features for layout are now accessible for viewing and editing in one easy to use window. We have also added a new test editor feature allowing the user to assign different text attributes to select text within a format tool.
In addition, if you are using AutoScript Desktop to edit and produce your transcript from a Word Template, you will now assign your template to the layout eliminating unnecessary steps of locating a template.
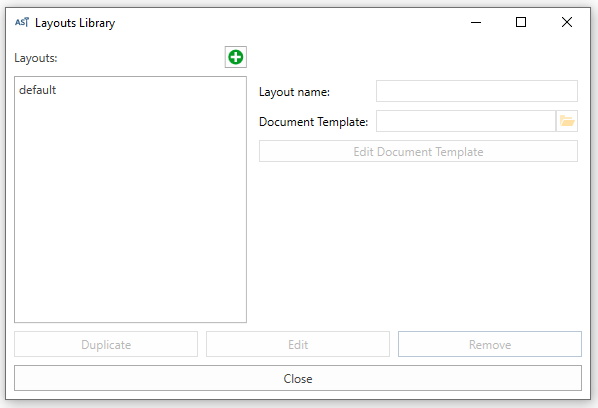
Layouts Library
This is where you will manage, create, edit, and remove layouts. Just go to the Job tab and click on Layouts Library.

This will open the Layouts Library dialog window.
Creating a new Layout
AutoScript desktop includes a generic layout called default. It is best to use this layout when creating a new one.
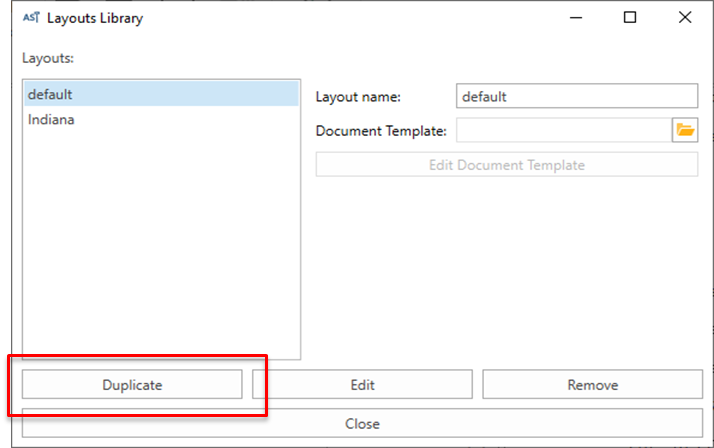
Click to highlight the default layout and click on the Duplicate button. Alternately you can click on the plus button.
Highlight the newly created layout so that the name now appears in the Layout name edit field and begin typing in the field to change the name to the new name for this layout. Presumably this name would have reference to the template you will choose in the next step.
Click on the open file icon next to the Document Template field to select the template that you will associate with this layout.
You will now see your new layout and associated template displayed.
Highlight the newly created layout and click on the edit button.
This will open the new Layout editing window.
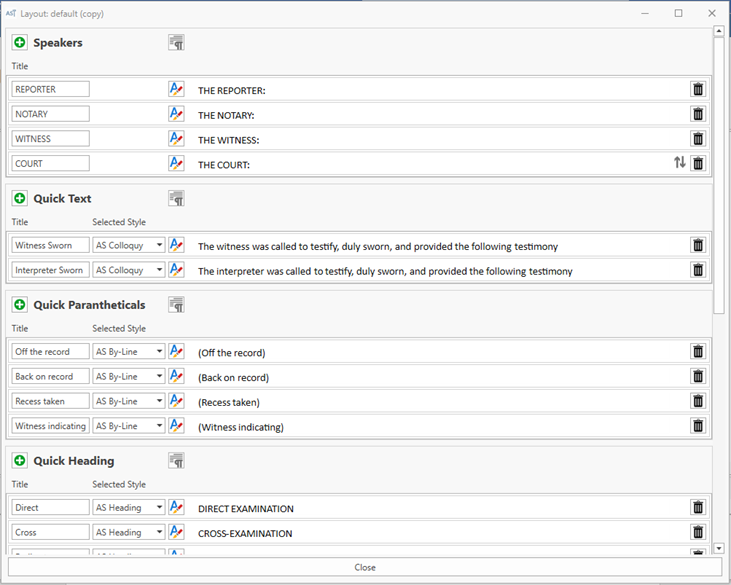
Begin by scrolling to the bottom of the window and selecting the style you want for your colloquy edits using the Colloquy format tool, clicking on the down arrow, and choosing the desired style. This can be a custom style from your template or one of the AutoScript provided basic styles.
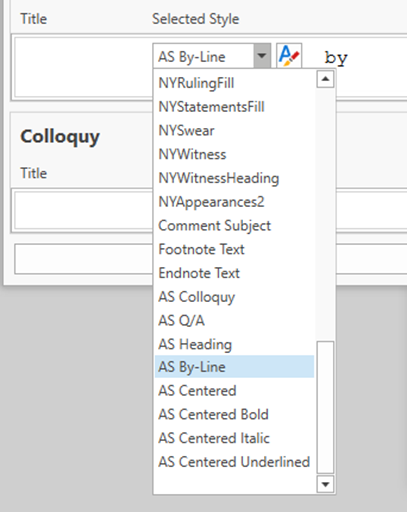
Select the style you want to use for your byline tool and edit the “by” text to appear as it should for your byline by typing directly into the text field. Don’t forget to add the extra space behind the work “by”.
Select the style you want to use for your Q&A tool by clicking on the down arrow and selecting the style that you want to use. Edit the text as you need the symbols for your “Q” and your “A” symbol to appear by editing it in the text edit field.

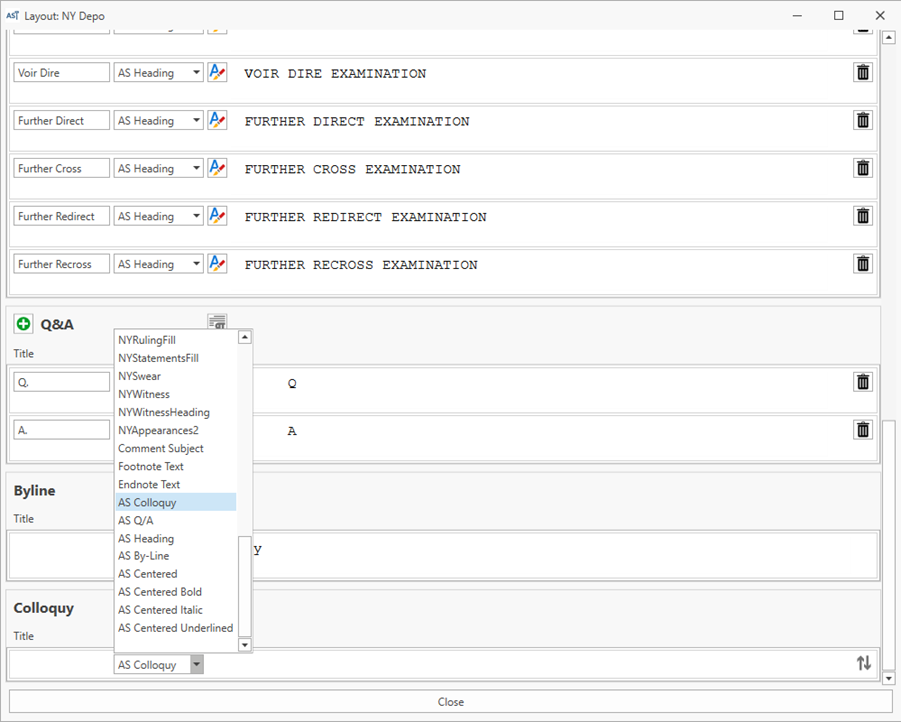
Select the style you want to use for your Section Heading tool by clicking on the down arrow and selecting the style that you want to use. Edit the text as you need it to appear for your section headings. ** Helpful hint ** If you have selected to use your Normal style and want the text to be centered, just position your cursor in front of the text in the text edit field and use Ctrl+E to center it.

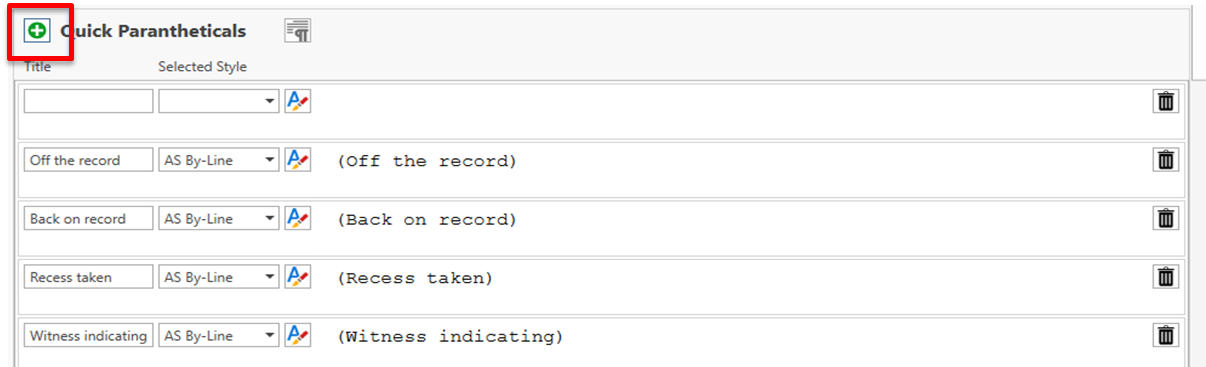
Select the style that you want to use for your Quick Parentheticals tool by clicking on the down arrow and selecting the style. Edit the text directly in the text edit field or click on the edit text button to open the text edit window. From here you can use the font editing tools to apply different font settings to the text and different paragraph settings.

If you need to add more entries for any format tool, click on the plus button and create additional entries, give it a title by typing in the title field, selecting the style, and typing directly into the text field.
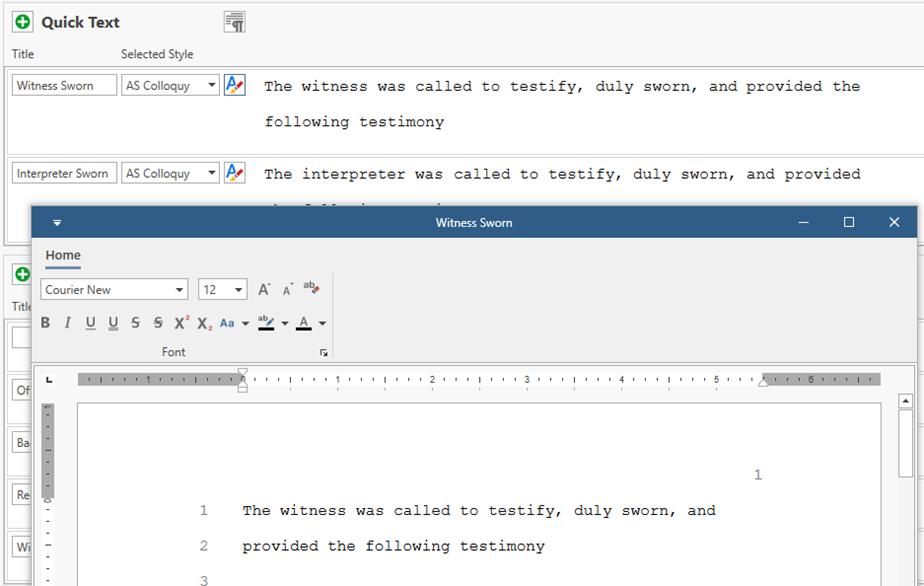
Select the style that you want to use for your Quick Text tool by clicking on the down arrow and selecting the style. Edit the text directly in the text edit field or click on the edit text button to open the text edit window. From here you can use the font editing tools to apply different font settings to the text and different paragraph settings. Remember, you can add additional entries by clicking on the plus button.
You can now reorder any items in a format tool that contains more than one item in the list.

Related Articles
AutoScript Web Release Notes - February 22, 2023
A VoiceScript.ai Product for the Legal Market Summary 2 WorkSpaces 4 User Management 9 Roles & Permissions 15 Creating a New Job 18 Workflow Management 20 Saving Jobs (Coming Soon) 24 AutoScript Web - Release Notes Summary Over the next few weeks, ...AutoScript Desktop - Release Notes - 1.1.329
Today's release of version 1.1.329 of AutoScript Desktop included the following: Bug Fix: Corrected a problem with the ASCII Export feature that was causing some words to be concatenated. As always, if you experience any trouble or just need a little ...AutoScript Desktop - Release Notes - 1.1.349
The release of version 1.1.349 of AutoScript Desktop included the following: Bug Fix: Closing the "Downloading Audio File" dialog doesn't cancel job loading Bug Fix: Paste in the Find & Replace boxes also pastes in the document Bug Fix: Words ...AutoScript Desktop - Release Notes - 1.1.406
The release of version 1.1.406 of AutoScript Desktop included the following: Core Change: We finally have our Microsoft certification. This means no more warnings upon installation, and less issues related to anti-virus software. Bug Fix: Spell check ...AutoScript Desktop - Release Notes - 1.1.459
The release of version 1.1.459 of AutoScript Desktop included the following: MAJOR BUG FIX: User Experiencing Crashes When Adding Comments BUG FIX: Triple-Clicking to Select ASR Placeholder Creates Highlight Desynchronization BUG FIX: Spellcheck ...